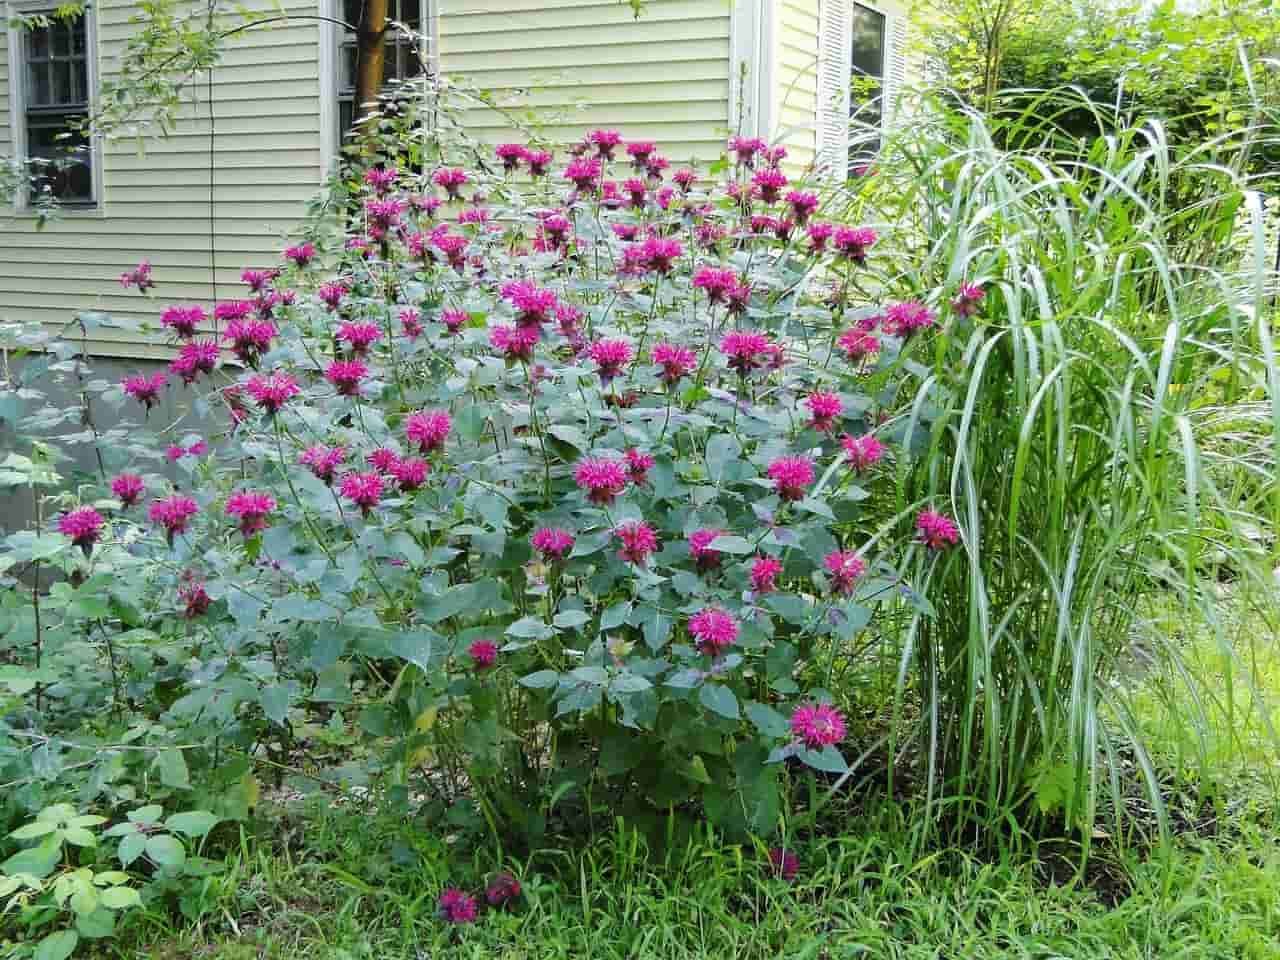
The aromatic leaves and vibrant blossoms of the multi-colored perennial monarda, often called bee balm, transform gardens and benefit pollinators. The tubular, multi-colored blossoms of this North American mint plant bring delight to gardeners. The flowers can be any shade of red, pink, purple, or white.
Additionally, it attracts hummingbirds, bees, and butterflies. Because of its adaptability, edible leaves and blossoms, and therapeutic properties, bee balm is a great plant to have in any garden, not to mention how pretty it is. From selecting the best variety to mastering propagation techniques and dealing with common issues, this comprehensive guide covers it all in bee balm cultivation.
Regardless of your degree of gardening expertise, you will find practical steps in these fifteen detailed paragraphs to ensure the success of your bee balm plant from seed to bloom and beyond. You can rely on practical guidance on topics such as soil preparation, watering schedules, pruning techniques, and pest control to ensure the success of your bee balm display. Come along with me as I go on a quest to design a garden star that will serve your needs while also adding beauty and vibrancy to your space. What are we waiting for? Let’s start growing and caring for bee balm in your garden.
Bee Balm Basics: Everything to Grow and Care for This Vibrant Flower
Understanding Bee Balm Monarda: The Botanical Background of This Vibrant Plant
Bee balm, scientifically known as Monarda, is derived from the Lamiaceae family, which also includes oregano and mint. This fact alone should suffice to elucidate its botanical origins. As proof of its climatic endurance, bee balm thrives well in USDA zones 3–9.
It is a native North American plant. The colorful, tubular flowers that produce a nectar-rich flower appear in the middle of summer, drawing pollinators. Monarda didyma (scarlet bee balm) has a lemony aroma and is one of several cultivars with distinctive colors and scents, such as Monarda fistulosa (wild bergamot).

Take note of the plant’s square stems, which are ideal for growing bee balm, and its fragrant leaves, which release a minty perfume when crushed. For these reasons, it is a suitable option for gardens that cater to the senses. When growing bee balm in different regions, it’s important to know when the first frost will occur in your zone and to select varieties that can withstand the humidity and temperatures where you are.
By providing food for native pollinators, bee balm is a valuable native plant that helps sustain ecosystems in its area. Researching the growing requirements for bee balm, which include full light and well-drained soil, may help you lay the framework for a successful plant that enhances garden aesthetics and biodiversity.
Exploring Types of Bee Balm: Varieties for Every Garden
| Variety | Flower Color | Height | Special Features |
|---|---|---|---|
| Monarda didyma | Fiery Red | Up to 4 ft | Attracts hummingbirds |
| Monarda fistulosa | Lavender | Up to 3 ft | Drought-tolerant, ideal for xeriscaping |
| Petite Delight | Pink | 18 inches | Dwarf, great for borders |
| Raspberry Wine | Deep Red | 3–4 ft | Vibrant color for mixed beds |
| Marshall’s Delight | Vivid Pink | 2–3 ft | Enhances garden aesthetics |
| Balmy Lilac | Lilac | 1–2 ft | Compact, suitable for pots |
There are many different kinds of bee balm, so it’s important to think about your garden’s environment and design while making your selection. Monarda fistulosa’s lavender blossoms and drought tolerance make it an ideal xeriscaping plant, while Monarda didyma’s fiery red blooms bring hummingbirds.
Because they don’t grow taller than 18 inches, dwarf bee balm varieties, like Petite Delight, are ideal for use as border plants. To enhance the color of bee balm flowers, choose cultivars like Raspberry Wine (a deep red) or Marshall’s Delight (a vivid pink). These varieties impart vibrant hues to mixed beds.
For maximum ecological benefit, it is best to employ native bee balm species as pollinators; these plants also benefit local animals. Balmy Lilac and other compact hybrids thrive in small spaces and pots. Every species of bee balm grows in its own unique way, so make sure to account for it when you plan your spacing.
Some propagate rapidly using rhizomes. Careful selection of bee balm cultivars allows you to achieve a balance between size, aesthetics, and ecological effect. Consequently, your garden will become a sanctuary for vibrant blooms that enhance your landscaping and attract pollinators.
Utilizing Bee Balm: Exploring Its Culinary and Medicinal Uses
Bee balm has several culinary uses, including the addition of its minty, oregano-like flavor to dishes cooked with its leaves and blossoms. During the American Revolution, Oswego tea was a fragrant infusion of either fresh or dried leaves. Toss edible flowers into salads or use them as a colorful and spicy garnish for desserts for a culinary twist.
Keep in mind that bee balm has anti-inflammatory and antibacterial properties when you research its medicinal uses. Bee balm can soothe a sore throat or small cut. You can create a salve with the infused oils of bee balm to soothe skin irritations, or steep dried leaves in hot water to make a calming tea as an herbal remedy.
For a unique flavor profile, consider cooking with bee balm blooms and adding syrups or jellies. If you want to make bee balm tea safely, you need to use plants that haven’t been pesticided and that have been harvested in a clean environment.
Bee balm is an adaptable plant with innate features that can improve your wellness practices and meals. Knowing these benefits, you can integrate this plant into your pharmacy and cuisine.
Choosing the Best Location: Where to Plant Bee Balm for Optimal Growth
Because it promotes vibrant blooming, bee balm is best planted in a spot that gets full sun for at least six hours per day. Some afternoon shade may be necessary to keep bee balm leaves from burning in hotter regions. For bee balm, choose loamy, well-drained soil that is pH 6.0 to 7.0; if the soil isn’t fertile enough, add compost.
Powdery mildew is a common fungal concern, so be certain there’s enough airflow when you’re talking about planting bee balm. Avoid crowding and be sure to leave at least 18 to 24 inches of space between each plant for bee balm. If you’re considering including bee balm in your garden design, plant it in pollinator gardens or mixed borders to showcase its vibrant color and tall stature.

For bee balm to thrive, it needs a dry, sunny spot away from any standing water. This is because the plant has shallow roots that hate being damp.
By meticulously selecting a location that fulfills bee balm’s growing requirements, you may cultivate an environment where it thrives, attracting pollinators and elevating the ever-changing aesthetic value of your garden.
Mastering Companion Planting: What Not to Plant with Bee Balm
| Companion Plants | Compatibility | Reason for Compatibility/Incompatibility | Garden Benefits |
|---|---|---|---|
| Echinacea | Compatible | Sun-loving, attracts pollinators | Enhances pollinator activity |
| Black-eyed Susan | Compatible | Well-drained soil, complements bee balm | Adds vibrant color |
| Ferns | Incompatible | Requires high water, different soil needs | Competes for resources |
| Mint | Incompatible | Aggressive spreader, competes for space | Overcrowds bee balm |
| Dwarf Amsonia | Compatible | Hides unruly bee balm stems, low-growing | Improves garden aesthetics |
| Phlox | Compatible | Similar growing conditions, attracts wildlife | Creates colorful display |
For optimal companion planting results, pair bee balm with sun-loving, well-drained plants that attract more pollinators, such as echinacea or black-eyed Susan. Avoid planting bee balm near plants that need a lot of water, like ferns, because its compatibility with companion plants depends on having similar growing circumstances.
If you want to keep bee balm from competing with aggressive spreaders like mint for space and nutrients, you should not use it on them. To hide the often unruly bottom stems of bee balm and make a harmonious bee balm garden companion arrangement, plant low-growing perennials like dwarf amsonia.
Incorporate bee balm into your pollinator garden design with phlox or daylilies for a colorful and wildlife-friendly show. Overcrowding is a major contributor to powdery mildew, so it’s important to know what not to do when planting bee balm.
By selecting plants that are conducive to bee balm growth, you may promote ecological harmony, enhance the aesthetics of your garden, and guarantee that your bee balm will grow in harmony with its neighbors, free from illness and competition.
Growing Bee Balm in Containers: Tips for Success in Pots
When growing bee balm in a container, make sure the pot is 12–18 inches wide so the roots have room to spread. Use a compost-enhanced, well-draining potting mix to meet the requirements for bee balm potting soil. For bee balm to thrive in pots, plant them in full sun, but in hotter climates, shade them in the afternoons to keep them from overheating.
Keep the soil evenly moist by watering potted plants frequently, as they dry out more rapidly than garden beds. Select dwarf varieties of bee balm, such as Petite Wonder, for balconies and patios with little space. Incorporate salvia and other tiny plants that attract pollinators into your bee balm patio garden.
Make sure the pots have drainage holes to prevent root rot and other issues with bee balm plants kept in containers. Deadheading and pinching back stems on a regular basis will keep bee balm plants in pots looking healthy and bushy.
Following these steps, you may cultivate vibrant bee balm in containers, bringing its beauty and ability to attract pollinators to even the most intimate spaces.
Planting Bee Balm Seeds: Tips for Successful Germination
For best results, when planting bee balm seeds, start with fresh or stratified seeds and let them sit in the fridge for 6–8 weeks to encourage germination. When planting bee balm seeds, make sure to do it at least eight weeks before the final frost. One way to do this is to sprinkle the seeds on a moist, loamy potting mix and leave them exposed to light.
Sowing bee balm seeds outside, gently pushing them into the soil in early spring or fall, is an option. When planting bee balm seeds indoors, make sure the trays are in a warm, well-ventilated spot and water gently so the seeds don’t get squished.
Bee balm will germinate best in soil temperatures of 60 to 70 degrees Fahrenheit, and you may expect to see sprouts in around 10 to 25 days. To prevent shock while transferring bee balm seedlings, harden them off beforehand.
When do you expect frosts in your area? Knowing the frost dates will help you determine the best time to sow bee balm seeds. By following these guidelines for planting bee balm seeds, you can give your seedlings the best chance of growing into healthy plants in your yard.
Growing Bee Balm from Seed: Explained in Simple Steps
To successfully grow bee balm from seed, one must first understand that cold stratification is required to end seed dormancy. Put the seeds in a plastic bag and refrigerate for at least six to eight weeks before you plan to plant them. When starting bee balm from seed indoors in the spring, a beginner’s guide recommends using a seed tray full of potting mix that drains well.
In order for bee balm seeds to grow, they must be spread out on top of the soil, gently pressed down, and placed in moist but not soaking soil. Plant bee balm seedlings in containers and place them in a bright window or under grow lights to maintain a consistent temperature of 60 to 70 degrees Fahrenheit.

When working with bee balm seed-to-bloom, it’s best to wait 10–25 days for germination after the last frost and to harden off seedlings before transplanting them. During the first year of bee balm’s growth, focus on growing strong roots because blooms won’t appear until the second year.
Include instructions for planting bee balm seeds, such as how often to water and how to prune, to keep plants from becoming overcrowded. Bee balm seedlings grown using this technique will be vibrant and beautiful additions to any garden.
Collecting Bee Balm Seeds for Future Planting
If you want to collect bee balm seeds at their best, you should wait until the flower heads are brown and dried in the late summer or fall. When harvesting bee balm seeds, be cautious not to jiggle the seed heads as you trim the stems below them, since the seeds tend to break off easily.
If you want to save bee balm seeds for later, just put the heads in a paper bag. Crush the dried heads over a basin to release the tiny black seeds of bee balm before planting. Then, sift to remove the chaff.
Bee balm seeds can be stored in a sealed jar in a cool, dry place for up to two years to ensure their viability. When planning a system to save bee balm seeds, be sure to label containers with the variety and the date of collection.
For future bee balm plantings, it is important to collect from healthy plants to ensure robust genetics. Provide a desiccant packet to protect bee balm seeds from moisture along with storage instructions. Learning how to collect bee balm seeds efficiently can help you save money, save the varieties you love, and guarantee a steady supply for your gardening needs in the future.
Mastering Bee Balm Care: Essential Tips for Thriving Plants
To get bee balm care suggestions, prioritize consistent wetness. Deep watering every 7 to 10 days will keep the soil consistently moist during dry seasons. You can keep bee balm plants moist and weed-free by covering them with a 2-inch layer of organic mulch, such as bark.
To lessen the risk of powdery mildew, follow the bee balm watering plan but do not water from above. Instead, water the root zone thoroughly. To avoid encouraging leggy growth while yet meeting the fertilizing needs of bee balm, try applying compost once a year instead of synthetic fertilizers.
Bee balm mulch also protects young plants’ roots from extremes in temperature. Keeping a watch out for pests like aphids and spraying neem oil as needed are part of bee balm garden care.
To ensure bee balm plants thrive, put seeds 18 to 24 inches apart in full sun and make sure they have plenty of airflow. Following these basic instructions for maintaining bee balm will ensure that your garden is always brimming with healthy plants that attract pollinators and add vibrant color to your space throughout the summer.
Timing Bee Balm Blooms: Understanding Flowering Seasons and Duration
The optimal time to expect bee balm blooming varies by variety and location, but generally speaking, it’s from mid-summer (June–July) until early October. During the bee balm blooming season, Monarda didyma typically blooms before Monarda fistulosa, which blooms in the latter part of July.
Regular deadheading of bee balm blossoms allowed new blooms to develop on side branches, which in turn prolonged the bloom period. When dealing with bee balm flowering tips, make sure plants receive full sun and proper water because stress might reduce the bloom period.
Keep in mind that bee balm seasonal blooms might only bloom for a shorter time in colder regions, while in warmer ones they put on a longer show. Incorporate stimulation for bee balm blooms by pulling down stems in early spring for bushier plants with more flower heads.
To understand the bloom cycle, keep in mind that bee balm flowers, when properly cared for, can last for 6–8 weeks. By mimicking the flowering patterns of bee balm, you may create a garden with a continuous color palette. As a result, your bee balm will remain a sanctuary for pollinators and an eye-catching centerpiece all summer long.
Expecting First-Year Blooms: Does Bee Balm Flower in Its First Season?
To help you set realistic expectations for bee balm first-year flowers, it’s helpful to know that most seed-grown plants focus on root and leaf development in the first season, with blooms typically appearing in the second year. If planted early enough, bee balm plants grown from transplants or divisions at a nursery can blossom in their first summer.
To maximize first-year flowering, bee balm requires full light, soil that drains well, and consistent watering. When dealing with early blossoms, keep in mind that bee balm varieties like Leading Lady Plum are bred for rapid flowering, typically blossoming within months.
Transplanting bee balm seedlings after the last frost will prolong the flowering period. Bee balm should be a part of your first-season care regimen to help prevent overfertilization, which promotes foliage over blossoms.

To encourage reblooming and help bee balm buds grow, deadhead early blooms. Knowing the growth patterns of bee balm can allow you to cultivate vigorous plants that establish aggressively and set the way for abundant blooms in coming seasons, even if the initial year’s blossoms are limited.
Managing Bee Balm Height: Understanding and Controlling Growth Patterns
| Variety | Height | Growth Control Method | Garden Placement |
|---|---|---|---|
| Monarda didyma | Up to 4 ft | Staking, spring pruning | Back of borders |
| Petite Wonder | 10–18 inches | Minimal pruning | Front of borders, containers |
| Marshall’s Delight | 2–3 ft | Pinching stem tips | Mixed beds |
| Raspberry Wine | 3–4 ft | Grow-through supports | Back of borders |
| Balmy Lilac | 1–2 ft | Light trimming | Containers, small spaces |
| Leading Lady Plum | 1–2 ft | Pruning for bushiness | Front borders, pollinator gardens |
Bee balm height control can range from 10 inches for dwarf cultivars to 4 feet for Monarda didyma, so it’s crucial to have that in mind. Staking taller bee balm varieties in windy areas could be necessary to prevent them from tilting as a result of their growth habits.
To control the size of bee balm plants, prune the stem tips in the spring to encourage bushier, shorter growth. To keep tall varieties of bee balm plants upright, anchor them or use grow-through supports early in the growth season.
If you want your bee balm plants to look their best, plant the taller variety behind garden borders and the miniature ones, like Petite Wonder, in front. Incorporate bee balm trimming for size by cutting off the exterior stems of plants that are lean.
If you want your bee balm to grow to a certain height, you need to give it plenty of sunshine and not fertilize it too much. Being an expert in bee balm size control processes will allow you to create a well-balanced garden display by ensuring that plants keep their structural integrity while still looking beautiful and proportionate.
Encouraging Continuous Blooms: How to Deadhead Bee Balm Effectively
Optimal bee balm deadheading tactics involve removing spent flowers during the blooming season to promote fresh blooms. Propagate bee balm blossoms by trimming just above the nearest pair of healthy leaves using clean pruners. This procedure promotes the development of offshoots.
Deadheading bee balm plants every few days from June to August can keep them blooming all season long. Deadheading bee balm plants, in addition to giving them enough water and sunshine, can help them bloom again after a stressful period.
If you’re concerned about both the environment and aesthetics, you can remove the blossoms of bee balm while still leaving some seed heads for birds to eat or harvest in the fall. One advantage of bee balm deadheading is that it helps small gardens control the spread of their plants because it limits self-seeding.
To make sure bee balm blooms last, remain vigilant for withered flowers on plants and treat them swiftly when necessary. Bee balm deadheading instructions will keep your display looking neat and colorful while encouraging waves of vibrant blooms. These instructions will ensure that your garden is filled with pollinators long into the late summer.
Pruning Bee Balm: When and How to Cut Back for Healthier Growth
If you want your bee balm plants to grow as tall as possible, the best time to prune them is in the late fall or early spring. After the first severe frost, trim the bee balm stems to only two or three inches above ground to prevent the spread of illness.
If you want your bee balm plants to become bushier and produce more flowers, pinch down the tops of their stems in the spring. To encourage healthy bee balm growth and improve air circulation, prune any damaged or dead leaves when the plant is in bloom.
To prune bee balm for the season, you can shorten its leggy stems if needed, but you should not cut it too much in the summer if you would rather not ruin its blooms. Get rid of the cut trash and reap the benefits of bee balm trimming to reduce the spread of powdery mildew.

To keep bee balm plants healthy, divide clumps when you prune them every three or four years. Mastering bee balm pruning techniques will help you maintain a compact, floriferous display that grows stronger each year, increase plant health, and stave off fungal problems.
Transplanting Bee Balm: Best Timing and Techniques for Success
To minimize stress and maximize transplant success, bee balm should be transferred in the early spring or fall, when plants are dormant. When transplanting bee balm, try to avoid the hot summer months. The roots could get shocked.
When transplanting bee balm, be careful to remove the clump and dig a wide circle around it to protect the plant’s shallow rhizomes. To prepare the soil for bee balm transplanting, choose a sunny spot with well-drained soil and add compost for richness.
When transplanting bee balm, make sure to space the new plants 18–24 inches apart and at the same depth. It is important to water bee balm well after transplanting and to maintain a continuously wet environment for the first several weeks.
Mulch the newly transplanted bee balm to keep the soil moist and protect the roots. Make sure your bee balm plants recover quickly from transplanting, bloom profusely, and keep being pollinator-friendly in your new garden design by following these steps.
Propagating Bee Balm: Methods to Expand Your Garden’s Beauty
To multiply your plant population, you need to look into methods such as cuttings, seed sowing, and division. Dividing mature clumps of bee balm in the spring is the best time to do it since you may divide the rhizomes into sections with strong roots, and then you can transplant them immediately.
Take 6-inch stem cuttings of bee balm in the early summer, dip them in rooting hormone, and plant them in a mixture of peat and perlite. That’s how you propagate bee balm cuttings. They need a damp environment to germinate.
To help with the propagation of bee balm seeds, it is recommended to scatter stratified seeds indoors for new plants. Dividing bee balm plants is the fastest way to start a spreading garden because it only takes one growing season to get blooms.
Be sure to include instructions on how to prevent bee balm cuttings from rotting by providing them with enough air circulation. To guarantee bee balm plant growth, water newly planted plants regularly and monitor them for pests. Learn these bee balm propagation techniques and fill your yard with beautiful bee balm. It enhances biodiversity and aesthetic appeal, and it will grow inexpensively.
Controlling Bee Balm Spread: Is It Invasive and How to Manage Growth
Bee balm is not an invasive plant, although its rhizomatous roots can spread rapidly, especially in wet soil. These facts should allay your concerns. To keep bee balm from spreading, you can either plant it in containers or use metal barriers to restrict root development.
Managing bee balm clumps calls for dividing them every three to four years, pulling out unhealthy centers, and replacing healthy areas according to the rules. To prevent bee balm from taking over your garden and to cut back on self-seeding, you should do it before seed heads develop.
Avoid invasive bee balm plants by growing smaller varieties, such as Balmy Lilac, which spread less. One way to stop bee balm from spreading is to cut off any new shoots as soon as you see them.
Because wet conditions encourage bee balm spreading, it is important to keep the soil dry to medium-moist to control its growth. Through the application of these bee balm growth management tactics, you may restrict its eager development, allowing you to preserve garden harmony while enjoying the pollinator-friendly flowers of bee balm.
Protecting Bee Balm from Wildlife: Is It Deer Resistant?
Because of its minty, aromatic leaves’ inherent ability to deter rabbits and deer, bee balm is a reliable choice for areas with a high concentration of wildlife. In bee balm gardens, animals are protected and pests are reduced by planting the plants in open areas where their scent may act as a repellent.
To create a more robust garden border, plant bee balm among other perennials that are resistant to deer, including lavender or salvia. In addition to its numerous benefits for animal welfare, the potent scent of bee balm deters smaller pests such as voles.

To protect your bee balm garden from deer, it’s best to grow it away from hostas and other plants that deer love. You may incorporate bee balm deer-proof gardening by keeping plants healthy. When plants are stressed, they may not be as efficient at deterring deer.
To ensure bee balm care that is resistant to wildlife, keep a lookout for infrequent browsing and, if needed, use physical barriers like netting. A low-maintenance, wildlife-resistant garden that thrives with minimal assistance and keeps your flowers intact can be yours with the help of bee balm, which is resistant to deer.
Ensuring Pet Safety: Is Bee Balm Toxic to Pets?
Before planting bee balm in a garden that welcomes pets, make sure the plant isn’t poisonous to canines and felines. If you’re concerned about bee balm toxicity, know that while consuming a large amount of it can lead to mild gastrointestinal problems, you can safely eat the flowers and leaves.
Plant bee balm in areas where your pets may readily reach it, but keep a close check on them so they don’t eat too much, as recommended by bee balm pet-friendly gardening. Blending non-toxic bee balm plants with other perennials, like coneflowers, can help you create a pet-friendly landscape.
Pesticides should not treat bee balm gardens due to the potential dangers of pesticide residues. We should carefully consider the health of pets before allowing them access to plants sprayed with organic pesticides.
Avoid digging and make your garden bee-friendly by planting plants in solid beds. Enjoy the beauty of nature without worrying about the well-being of pollinators or your pets by incorporating bee balm into your landscape design. It is known to be pet-safe.
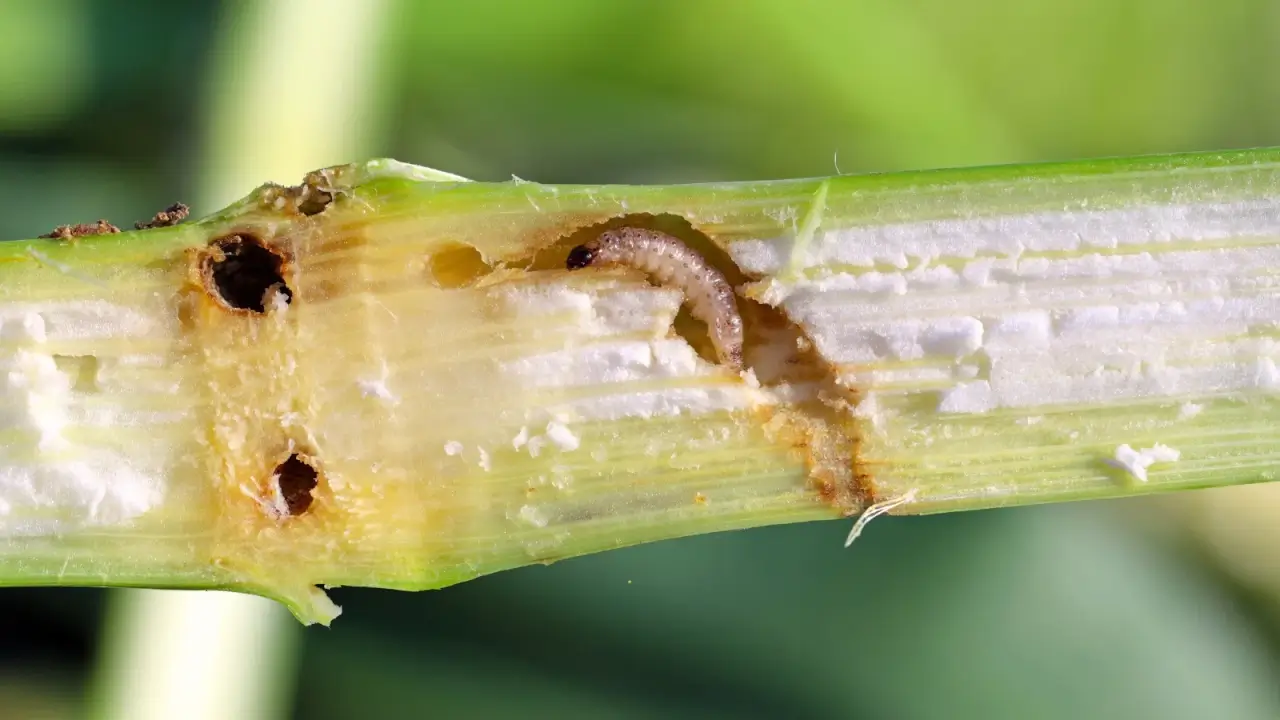
Solving Bee Balm Problems: Identifying and Managing Common Issues
| Issues | Causes | Solutions | Prevention |
|---|---|---|---|
| Powdery Mildew | Wet foliage, poor air circulation | Remove affected leaves, improve airflow | Space plants 18–24 inches apart |
| Aphids | Pest infestation | Apply neem oil or insecticidal soap | Regular monitoring |
| Spider Mites | Dry conditions, pest infestation | Use insecticidal soap | Maintain consistent moisture |
| Yellowing Leaves | Nitrogen deficiency | Add compost to soil | Annual soil testing |
| Root Rot | Overwatering, poor drainage | Improve drainage, reduce watering | Use well-drained soil |
| Stunted Growth | Poor sunlight, nutrient deficiency | Ensure full sun, add compost | Proper site selection |
It’s crucial to monitor for powdery mildew when addressing common bee balm issues. Wet foliage or inadequate air circulation commonly causes this fungal disease, which can lead to white spots on the leaves. To prevent powdery mildew on bee balm, plants should be 18 to 24 inches apart.
To avoid waterlogging, place water directly at the root zone. Aphids and spider mites are two of the pests that bee balm plants can suffer from. If needed, apply neem oil or insecticidal soap.
If your bee balm is suffering from nutrient deficiencies, check the soil every year; for example, if the leaves are turning yellow, it can be because of a lack of nitrogen, which compost can remedy. To stop the spread of bee balm disease, cut off diseased stems and throw them away.
When addressing bee balm, it’s best to choose mildew-resistant cultivars, such as Jacob Cline. To ensure your plants stay healthy, water them regularly and place them in a broad sun to reduce stress. These bee balm problem-solving tactics will keep your plants healthy, cut down on setbacks, and provide a vibrant, pollinator-friendly display all season long.
Conclusion
The addition of bee balm to any garden brings joy through its fragrance, color, and ecological benefits, making its cultivation and maintenance a rewarding experience. With the knowledge you’ve gained from this guide, you should be able to successfully cultivate bee balm plants.


Leave a Reply